Tutorial 3 - Detecting Collisions
Summary
Use the physics API to perform scene queries and manipulate entities using forces. Use collision filters and collision events to detect and control collisions. This tutorial expands on the previous player controller tutorial. You will use physics scene queries to determine if your avatar is on ground and can jump. Your avatar will shoot projectiles that apply an impulse to objects when a collision is detected. Collision filters will be configured to control which entities can collide and receive collision events. You will use a physics material to set the player's friction to zero and prevent sticking to walls.
Requirements
- Reactor Requirements
- Completion of Tutorials 1 and 2.
Setup
- Start with the scene you created in Tutorial 2.
Create Collision Filters for Players, Bullets, and Terrain
Collision filters are used to assign entities to one or more collision groups and define how they interact with other groups. You can assign a collision filter to the ksEntityComponent and the collision filter will be used for all the colliders on the entity. Or you can assign a collision filter to a collider, which will override the collision filter on the ksEntityComponent. For more information on collision filters and collision events, see here.
Collision filters consist of three sets of flags: groups, notify, and collide.
- Groups determines which collision groups the object belongs to. Objects may belong to multiple groups.
- Collide determines which groups to physically collide with. In order for two entities to collide, they both must belong to groups that the other collides with.
- Notify determines which groups will generate events when a collision or overlap occurs. If you set a filter to notify but NOT collide with a group, you will get
OverlapStartandOverlapEndevents as those entities pass through each other. Groups that do notify and collide will generateCollision,ContactUpdate, andContactLostevents. Only entities with the filter that is set to notify will receive events. So if entity 1 in group A is set to notify with group B, and entity 2 in group B is not set to notify with group A, entity 1 will receive events when the two entities collide, and entity 2 will not.- If a trigger collider is assigned a filter that has no notify flags set, it will receive overlap events for all groups.
Entities without a collision filter will use the default collision filter that belong to all groups, collide with all groups, and notify with none. You can change the default collision filter by assigning a different filter to the 'Default Collision Filter' in the ksPhysicsSettings inspector on the Room game object.
- Open the 'Menu Bar->Reactor->Settings' menu. Expand the 'Collision Groups' section. This allows you to assign names to collision groups to be displayed in the editor. You can also assign collision group names when editing any collision filter assets.
- Name the first three collision groups 'Player', 'Bullet', and 'Terrain'.
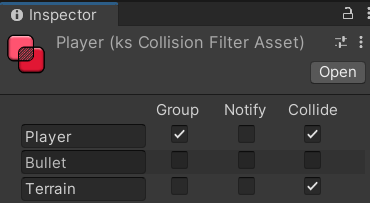
- Create a collision filter asset by right-clicking in the project window and selecting 'Create->Reactor->Collision Filter' and name it 'Player'.
- Assign the 'Player' filter to the 'Player' group, and set it to collide with 'Player' and 'Terrain'.
- Create a collision filter named 'Bullet'.
- Assign the 'Bullet' filter to the 'Bullet' group, and set it to notify with 'Player' and 'Terrain' and collide with nothing.
- Create a collision filter named 'Terrain'.
- Assign the 'Terrain' filter to the 'Terrain' group, and set it to collide with 'Player' and 'Terrain'.
- Select the 'Platform' and all dynamic game objects. In the inspector for the ksEntityComponent, set the collision filter to 'Terrain'.
- Select the 'Avatar' prefab and set the collision filter to 'Player'.
Create a Frictionless Physics Material
Physics materials control the friction and bounciness of rigid bodies. Friction causes the player's avatar to stick to walls when running into a wall. We will create a physics material with zero friction and assign it to the player's avatar to prevent it from sticking to walls. The player controller sets horizontal velocity to zero when no inputs are pressed to prevent sliding on the ground event when there is no friction.
- Right-click in the project window and select 'Create->Physic Material' and name the material 'NoFriction'.
- Set the 'Dynamic Friction' and 'Static Friction' to zero.
- Set the 'Friction Combine' to 'Minimum'.
- Select the 'Avatar' prefab and set the 'Physics Material' in the ksEntity inspector to the 'NoFriction' material you just created.
Create a Bullet Entity Prefab
- Create a sphere.
- Rename it to 'Bullet'.
- Set the scale to (0.2, 0.2, 0.2).
- Add a ksEntityComponent.
- Add a Rigidbody component.
- Set the collision filter to 'Bullet'.
- Uncheck the 'Use Gravity' property in the Rigidbody component.
- Make the bullet a prefab in the 'Resources' folder.
- Delete the bullet from the hierarchy.
Scripting
Create a Server Bullet Script
The server bullet script destroys the bullet when it collides with something or after one second. It applies an impulse to entities it collides with.
- Select the 'Bullet' prefab.
- In the 'Add Component' menu, select 'Reactor->New Server Entity Script'.
- Name the script 'ServerBullet'.
ServerBullet.cs
using KS.Reactor.Server;
using KS.Reactor;

public class ServerBullet : ksServerEntityScript
{
    // The entity that shot the bullet.
    public ksIServerEntity Shooter;

    // The bullet destroys itself after this many seconds.
    private float m_lifetime = 1f;

    // Called when the script is attached.
    public override void Initialize()
    {
        Room.OnUpdate[0] += Update;

        // Register an overlap event handler.
        Entity.OnOverlapStart += OnOverlap;
    }

    // Called when the script is detached.
    public override void Detached()
    {
        Room.OnUpdate[0] -= Update;
        Entity.OnOverlapStart -= OnOverlap;
    }

    private void Update()
    {
        // Destroy the entity when m_lifetime reaches zero.
        m_lifetime -= Time.Delta;
        if (m_lifetime <= 0)
        {
            Entity.Destroy();
        }
    }

    private void OnOverlap(ksOverlap overlap)
    {
        // Ignore overlaps with the entity that shot the bullet.
        if (overlap.Entity1 != Shooter)
        {
            // Apply an impulse to the entity we hit.
            ksRigidBody rigidBody = Scripts.Get<ksRigidBody>();
            ksRigidBody otherBody = overlap.Entity1.Scripts.Get<ksRigidBody>();
            if (rigidBody != null && otherBody != null)
            {
                otherBody.AddForce(rigidBody.Velocity * .25f, ksForceMode.IMPULSE);
            }

            // Destroy the bullet.
            Entity.Destroy();
        }
    }
}
Modify the Avatar Controller to Make it Shoot and Jump off the Ground
We will use a physics query to determine if the avatar is on the ground and can jump. There are three types of physics queries: sweeps, raycasts, and overlaps. We will use a sweep query below the avatar to see if we hit ground. See here for more information on how to use physics queries. We will also define and register a new shoot button input and use a delegate to handle shooting.
- Open and edit AvatarController.cs from Tutorial 2.
AvatarController.cs
using System;
using KS.Reactor;

// IDs for axes inputs
public class Axes
{
    public const uint X = 0;
    public const uint Y = 1;
    public const uint ROTATION = 2;
}

// IDs for button inputs
public class Buttons
{
    public const uint JUMP = 0;
    public const uint SHOOT = 1;
}

public class AvatarController : ksPlayerController
{
    [ksEditable] private float m_speed = 5f;
    [ksEditable] private float m_turnSpeed = 360f;
    [ksEditable] private float m_jumpSpeed = 6f;
    // How long in seconds before we can shoot again
    [ksEditable] private float m_shootInterval = 1f / 3f;

    // We use a delegate to handle shooting. The delegate is bound on the server and does nothing on the client.
    public Action OnShoot;

    private float m_shootTimer = 0f;
    private ksSweepParams m_sweepParams;

    // Unique non-zero identifier for this player controller class.
    public override uint Type
    {
        get { return 1; }
    }

    // Register all buttons and axes you will be using here.
    public override void RegisterInputs(ksInputRegistrar registrar)
    {
        registrar.RegisterAxes(Axes.X, Axes.Y, Axes.ROTATION);
        registrar.RegisterButtons(Buttons.JUMP, Buttons.SHOOT);
    }

    // Called after properties are initialized.
    public override void Initialize()
    {
        // Create sweep parameters for ground detection. CreateSimulationQueryParams preconfigures the params to only detect
        // entities the avatar entity can collide with.
        m_sweepParams = Physics.CreateSimulationQueryParams(Entity);
        m_sweepParams.Direction = ksVector3.Down;
        m_sweepParams.Distance = .1f;
    }

    // Called during the update cycle.
    public override void Update()
    {
        // Convert input to rotation in degrees between -180 and 180.
        float targetRotation = Input.GetAxis(Axes.ROTATION) * 180;

        // Convert rotation to a direction vector.
        ksVector2 direction = ksVector2.FromDegrees(targetRotation);

        // Add the direction vector to the entity's position to get the target.
        ksVector3 target = Transform.Position + new ksVector3(direction.X, 0f, direction.Y);

        // Rotate the entity towards the target.
        Transform.RotateTowards(target, m_turnSpeed * Time.Delta);

        // Convert input to horizontal velocity
        ksVector3 velocity = new ksVector3(Input.GetAxis(Axes.X), 0f, Input.GetAxis(Axes.Y)).Clamped(1f) * m_speed;

        // Preserve vertical velocity from the rigid body.
        velocity.Y = RigidBody.Velocity.Y;

        // If jump is pressed, do a sweep test to see if we can jump (if we are touching the ground).
        if (Input.IsPressed(Buttons.JUMP))
        {
            // Sweeps don't always detect hits if the entity is touching an object at the start of the sweep, so we start the sweep .05
            // above the entity to ensure we aren't touching the ground at the beginning of the sweep.
            m_sweepParams.Origin = Transform.Position + ksVector3.Up * .05f;
            if (Physics.SweepAny(m_sweepParams))
            {
                // Set vertical jump velocity
                velocity.Y = m_jumpSpeed;
            }
        }

        // Set velocity
        RigidBody.Velocity = velocity;

        // Check if we can shoot
        if (m_shootTimer > 0f)
        {
            // Decrement shoot timer
            m_shootTimer -= Time.Delta;
        }
        else if (OnShoot != null && Input.IsDown(Buttons.SHOOT))
        {
            // Set the shoot timer and call the shoot delegate.
            m_shootTimer = m_shootInterval;
            OnShoot();
        }
    }
}
Modify the BindInputs Script to Bind Shoot Input
We need to bind our new button input to Unity input in our BindInputs script.
- Open BindInputs.cs from Tutorial 2.
- Modify the
Startfunction to bind Buttons.SHOOT to Unity axis "Fire1".
BindInputs.cs
using System.Collections.Generic;
using UnityEngine;
using KS.Reactor;
using KS.Reactor.Client.Unity;

// Bind inputs with Reactor
public class BindInputs : MonoBehaviour
{
    // Run when the game starts.
    void Start()
    {
        // Bind Unity input to Reactor input.
        ksReactor.InputManager.BindAxis(Axes.X, "Horizontal");
        ksReactor.InputManager.BindAxis(Axes.Y, "Vertical");
        ksReactor.InputManager.BindButton(Buttons.JUMP, "Jump");
        ksReactor.InputManager.BindButton(Buttons.SHOOT, "Fire1");
    }
}
Modify the Server Room Script to Handle Shooting
The server room script assigns an OnShoot delegate to the controller to handle shooting.
- Open ServerRoom.cs from Tutorial 2.
- Add a const
BULLET_SPEED - In the
SpawnAvatarfunction, make the controller'sOnShootdelegate spawn a bullet.
ServerRoom.cs
    ...
    public const float BULLET_SPEED = 16f;
    ...
    // Spawn an avatar for a player.
    public void SpawnAvatar(ksIServerPlayer player)
    {
        // Spawn the avatar at a random position in a circle with radius 5 at a height of 10.
        ksVector2 position = m_random.NextVector2() * 5f;
        ksIServerEntity avatar = Room.SpawnEntity("Avatar", new ksVector3(position.X, 10f, position.Y));
        if (Controller != null)
        {
            // Create and attach a copy of the controller asset.
            avatar.SetOwner(player, Controller.Clone());
        }
        else
        {
            // If there is no controller asset, construct a new AvatarController and attach it.
            avatar.SetOwner(player, new AvatarController());
        }

        AvatarController controller = avatar.PlayerController as AvatarController;
        if (controller != null)
        {
            // Spawn a bullet when the shoot delegate is called.
            controller.OnShoot = () =>
            {
                ksIServerEntity bullet = Room.SpawnEntity("Bullet", avatar.Transform.Position);
                bullet.Scripts.Get<ksRigidBody>().Velocity = avatar.Transform.Forward() * BULLET_SPEED;

                // Set the bullet's shooter to the avatar who fired the bullet.
                bullet.Scripts.Get<ServerBullet>().Shooter = avatar;
            };
        }
    }
    ...
Testing
- Build your scene config (CTRL + F2).
- Start a local server.
- Enter play mode.
You should only be able to jump while you are on the ground. You will shoot as long as you are holding down the mouse. Bullets will disappear when they collide with something, and will push around any dynamic cubes or other players they collide with.