Tutorial 1 - The Basics
Summary
Create a simple client/server application where players click on the screen to throw a physics cube into the play area. The server is authoritative.
Requirements
Installation
If you have not already, follow the 'Setup' instructions from the Overview to install the Reactor plugin and local server.
Scene and Prefab Setup
Create a Room
We start by creating a room object that allows us to configure the server and attach server rooms scripts that run sever-side.
- Right click in the hierarachy window and create a 'Reactor->Physics Room' game object. This will create a game object with ksRoomType, ksPhysicsSettings, and ksConnect components.
- The ksRoomType component allows configuration of the network sync rate, entity transform precision, and other room settings.
- The ksPhysicsSettings component will enable physics simulations. The properties of this component can be used to configure the default simulation settings.
- The ksConnect component controls how a client connects to a server and provides registration points for connection event handlers.
Create a Static Platform to be the Ground
- Right click in the hierarachy window and create a cube. Rename it to 'Platform'.
- Set the transform position to (0, 0, 0).
- Set the transform scale to (20, 1, 20).
- Click the 'Add Component' button in the inspector and add a 'Reactor->ksEntityComponent'.
- The ksEntityComponent informs the Reactor build service that this object will be needed by the server.
- The 'Is Permanent' property in the ksEntityComponent tells the server that this object exists on all clients and does not need to be synced across the network.
- Select the camera and set its position to (0, 5, -15) and rotation to (20, 0, 0).
Create a Dynamic Cube Prefab that is Server-Controlled
- Right click in the hierarachy window and create a 'Cube'.
- Click the 'Add Component' button in the inspector and add a 'Reactor->ksEntityComponent'.
- Click the 'Add Component' button in the inspector and add a RigidBody component.
- Drag the 'Cube' object from the hierarachy window into the 'ReactorScripts/Resources' folder.
- This creates a prefab of the 'Cube' which can be spawned on the server.
- Delete the 'Cube' object from the hierarachy.
Reactor requires that prefabs that define entities used by the Reactor server be placed in a 'Resources' folder. Reactor will search these folders for entities with ksEntityComponents when building the server configuration files. Placing the files here also enables the client code to efficiently load and instatiate objects when a spawn request is received from the server. In this tutorial we used 'ReactorScripts/Resources' however any folder with the 'Resources' name will work.
Scripting
Create a Client Room Script to Send Mouse Click Data to the Server
In this project the user will click in the window and launch cubes towards the platform. To do this we need to detect player inputs and then invoke a remote procedure call (RPC) with information about the action. This code will be added to a client room script that will only be active when the game is connected to a server room. In the next section we will handle the RPC message on the server.
- Select the 'Room' object in the hierarachy window.
- Add a 'Add Component->Reactor->New Client Room Script', name it 'ClientRoom' and enable code generation for 'Update'. Open the script after it is added to the room.
ClientRoom.cs
using UnityEngine;
using KS.Reactor;
using KS.Reactor.Client.Unity;

public class ClientRoom : ksRoomScript
{
    // Called once per frame
    void Update()
    {
        if (Input.GetMouseButtonDown(0))
        {
            // Generate a ray that extends from the camera into the scene where the mouse was clicked.
            Ray ray = Camera.main.ScreenPointToRay(Input.mousePosition);

            // Call an RPC with ID = 0 and include the ray origin and direction.
            Room.CallRPC(0, ray.origin, ray.direction);
        }
    }
}
Create a Server Room Script to Spawn Cubes When Users Click
To handle the server behaviours we will add a server room script to the Room object. This script will be compliled and uploaded to the server. In the script we will handle player join and leave events, spawn entities when an RPC is received and remove entities that fall out of bounds.
- Select the 'Room' object in the hierarachy window
- Add a 'Add Component->Rector->New Server Room Script', name it 'ServerRoom' and enable code generation for 'Update' and 'OnPlayerJoin/Leave'. Double click the script to open it in an editor.
ServerRoom.cs
using KS.Reactor;
using KS.Reactor.Server;

public class ServerRoom : ksServerRoomScript
{
    // Initialize the script. Called once when the script is loaded.
    public override void Initialize()
    {
        // Register a event handler that will be called when a new player joins the server.
        Room.OnPlayerJoin += PlayerJoin;

        // Register a event handler that will be called when a player leaves the server.
        Room.OnPlayerLeave += PlayerLeave;

        // Register an update event to be called at every frame at order 0.
        Room.OnUpdate[0] += Update;
    }

    // Cleanup the script. Called once when the script is unloaded.
    public override void Detached()
    {
        Room.OnPlayerJoin -= PlayerJoin;
        Room.OnPlayerLeave -= PlayerLeave;
        Room.OnUpdate[0] -= Update;
    }

    // Handle player join events.
    private void PlayerJoin(ksIServerPlayer player)
    {
        ksLog.Info("Player " + player.Id + " joined");
    }

    // Handle player leave events.
    private void PlayerLeave(ksIServerPlayer player)
    {
        ksLog.Info("Player " + player.Id + " left");
    }

    // Called once per frame
    public void Update()
    {
        // Check the Y position of all entities and destroy those whose value is less than -10.
        // This prevents dynamic entities such as the cube from falling forever after they fall off the platform.
        foreach (ksIServerEntity entity in Room.Entities)
        {
            if (entity.Transform.Position.Y < -10.0f)
            {
                entity.Destroy();
            }
        }
    }

    // A ksRPC attribute is used to tag a method which will be invoked when an RPC is received by the server.
    // The method parameters must start with a ksIServerPlayer object and be followed by the RPC parameters.
    // In this case we want to handle an RPC with ID = 0 which includes a raycast origin and direction.
    [ksRPC(0)]
    private void SpawnCube(ksIServerPlayer player, ksVector3 origin, ksVector3 direction)
    {
        // Spawn a "Cube" entity at the origin
        ksIServerEntity cube = Room.SpawnEntity("Cube", origin);

        // Add a velocity to the cube in the direction of the ray.
        cube.Scripts.Get<ksRigidBody>().Velocity = direction.Normalized() * 30.0f;
    }
}
Testing
Local Servers
The local server allows you to quickly debug and test server code.
- Press CTRL-F2 to build the server config files.
- Press CTRL-F3 to build the server runtime module.
- Select the Room object and change the 'Connect Mode' property of the ksConnect component to LOCAL.
- Select the 'Room' object and click the 'Start Local Server' button in the ksRoomType component.
- This should open a server log window where server messages are reported.
- The server will be run as a separate process to Unity. Make sure to click the stop button (Or close the server application) once you are done with the server.
- Click play in Unity to launch the game. The connect script will connect to the local server. When that happens you will see a message in the server logs.
- When you are connected, each mouse click in the game view will shoot a cube into the scene.
- When you are done testing, exit play mode and stop the local server.
Live Servers
Live server instances run online. Copies of your game client are able to join the instances to play the game together.
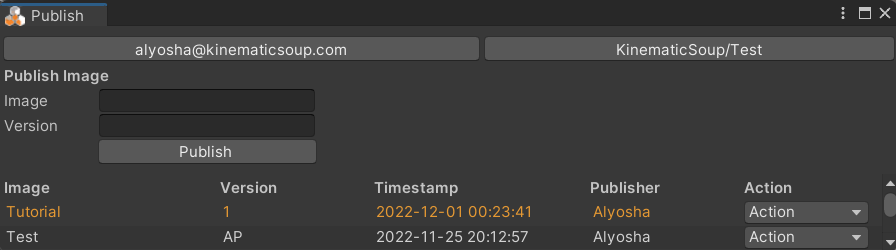
- Select 'Reactor->Publishing' from the top bar menu. This will open a window that requires you to login with your KinematicSoup account.
- After you have logged in, you will see your current account and project at the top of the window. You can select your email address to logout. If your account is associated with more than one project you can use the project drop down to select the project you want to use.
- Enter an image name and version in the form and click the 'Publish' button. This will build the ksServerRuntime and configs, and then package them as a Reactor image. The client application will also be bound to this image. The image is then uploaded to our servers. After a moment you should see your published image in a list below the publishing inputs. The image name will be orange to show the client is bound to it.
Now that the image is published you can launch online instances using the Reactor 'Servers' panel.
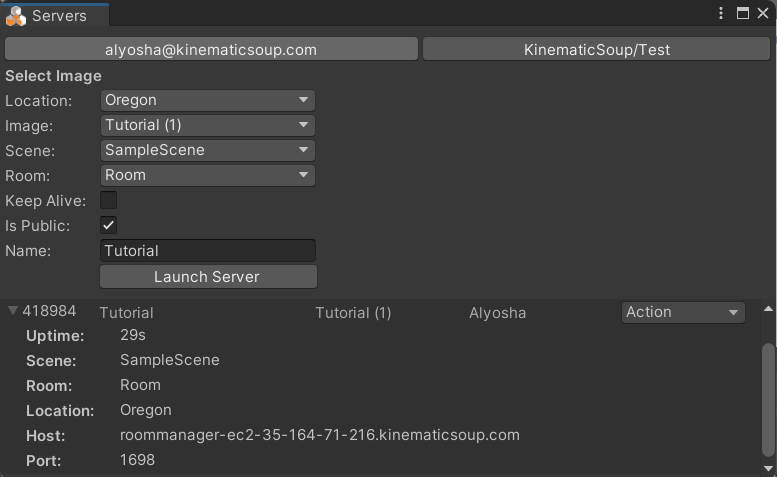
- Select 'Reactor->Servers' from the top bar menu. This will open a window that allows you to launch server instances from published images.
- Configure the launch options for your server instance in the form.
- Location is used to select the geographic region where the server will be hosted.
- Scene contains a list of Unity scenes available to the image.
- Rooms contains a list of Rooms available in a scene.
- Keep Alive will restart servers if they stop unexpectedly. It is recommended that you test servers for common errors before enabling this option.
- Is Public will allow clients to find this server in a list of public instances by calling
ksReactor.GetServers. - Name is the name you want to give this instance.
- Check the 'Is Public' property and provide a name for this instance then click the 'Launch' button.
- After a moment your server should appear in a list of running instances.
- You can use the action button in the list to stop, duplicate, or restart instances.
- Once the server is started, select the room and change the 'Connect Mode' property of the ksConnect component to 'ONLINE'.
- Entering play mode should now connect to the online server. At this point you can build your Unity executable and distribute it to other users. In this test scenario, where there is only one public server, all users will connect to the same instance and everyone should see the cubes spawned by the other users.
- Once you are done testing, open the 'Servers' window and stop the server instance.